Hello!! everyone today am going to share a DIY memo board with a small toy wooden carrom board and its for the LESSology challenge Toy story..
lets begin..
 supplies needed are floral bunch stencil, acrylic colors, small wooden clothe pins, satin ribbon ,sponge pieces to dab the colors on stencil, quilled flowers, wall hanger ,white cardstock ..


These cute embellishments are gift from my friend lavanya :)..I have used the flower added at the left bottom edge ..

 added a flower wall hanger to the upper right edge so that I can hang room keys or vehicle keys there..
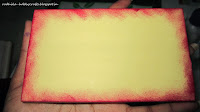
 added things to buy list its empty now .. placed the marker to write
 here is my completed memo board..

I have hanged it on my door.. its perfect on the door..


Linking it to
LESSology - Toy Story
Hope you liked it ..
Thanks for stopping by ..have a nice day..

lets begin..
This is the small toy wooden carrom board am using ..


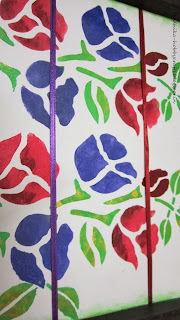
on the white cardstock placed the stencil and added acrylic colors with sponge pieces

cut out the colored cardstock and glue it in the toy carom board


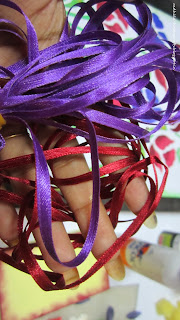
Add satin ribbon before sticking the cardstock to the carom..


add these small wooden clothes pins to the satin ribbons so that you can tag the any list ,photo or any thing..


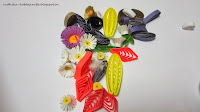
I have quilled some daisies and leaves Decorate the edges with quilled flowers and florist ribbon Rose flowers will post these Florist ribbon rose tutorial soon .. and added sticky notes to it n shaded the edges with sponge..


arranged them like this

a close up of florist ribbon roses ..

Its the back of the carom it has four knobs I have added satin ribbon to one of the knob to hang..

These cute embellishments are gift from my friend lavanya :)..I have used the flower added at the left bottom edge ..


I have hanged it on my door.. its perfect on the door..


Linking it to
LESSology - Toy Story
Hope you liked it ..
Thanks for stopping by ..have a nice day..

Wonderful idea to make a memo board Radhika ! I loved the purple roses.
ReplyDeleteThank you so much Pooja :)
DeleteNice one radika.... Lovely ribbon roses
ReplyDeleteThank you Sujana :)
DeleteUsing carom board in this way is such a clever idea!! I have never seen this before. Looks lovely. I loved purple ribbon roses too. Looking forward to the tutorial :)
ReplyDeleteThank you Jasleen :)
DeleteI love your new project, Radhika. It is bright and have nice details to view
ReplyDeleteThank you selena :)
DeleteWow! This is soooo creative, & it looks sensational AND it's totally useful....fabulous work - so glad you joined us in the LESSology challenge:)))
ReplyDeleteThank you so much lizzy :)
DeleteIt is so awesome how you transformed the carrom board into something that lovely, thanks for sharing it with us at LESSology!
ReplyDeleteThank you so much Kirsty :)
DeleteSooooo clever! Love how you transformed the carrom board into something soooooo pretty and practical too! :)
ReplyDeleteThanks for joining us at LESSology!
Thank you so much yyam :)
DeleteWonderful idea Radhika !! to transform the carrom board to something so pretty and useful !!
ReplyDeleteThank you Suman :)
Deletebeautiful idea, Radhika! you have decorated the board aesthetically.
ReplyDeleteEspecially note of Things to buy and smile is perfect, and makes me happy too :)
Thank you Shilpa :)
DeleteOh you are so very clever, great work.
ReplyDeleteThank you Merry :)
DeleteWowwwwwwww! This is amazing!!! Thanks so much for playing along with LESSology!!
ReplyDelete